Sunday, December 12, 2010

DR400 engine rebuild 3


Two cylinders, one that has been rebored to about 87mm (standard bore is 85mm) and one rusty one which is ??mm. Two cylinder heads, one with a broken inlet valve (you can see where the valve marked the combustion chamber in the top photo) and the other with a slightly bent inlet valve. So I suppose you could assume that the engine was disassembled because either a cam chain snapped or the engine was assembled previously with incorrect cam timing and caused the piston to bend the inlet valve. There appears to be no damage in the crankcases where the cam chain runs so I think the cause was the latter. Either way I will still be investing in a new cam chain.


DR400 engine rebuild 2


Two pistons one standard size in good nick, one piston 050 oversize with some scoring on the exhaust side

DR400 engine rebuild 1


Here are all the major engine components laid out on my new work bench, in my new workshop which is the size of a large broom cupboard. This is exactly how I got the engine

Saturday, November 27, 2010

Red Bull F1 tears up Perth City Streets

It wasn't advertised, but yesterday at lunchtime Perth boy Daniel Ricciardo (Red Bull test driver) got to lay some F1 rubber down on Riverside Drive and Victoria Avenue Perth City. This is some footage I captured on my cell phone. What an awesome noise. Cannot wait to see Mark Webber do some hot laps around Wanneroo Raceway on Sunday. If someone can tell me how I can rotate the video I'd appreciate it.

Thursday, November 11, 2010

Dumpster diving yields six exhausts


Was looking through one of my favorite dumpster locations a few weeks back and found these six two-stroke exhaust pipes. Most are in fairly good shape too. Love free stuff!!!

Motorcycle seat repair $5 plus glue


I finally got round to repairing my seat which I had cut and shut to improve the lines. I took about 25mm off the top and about 75mm off the length. This allowed me to retain the old seat cover, I simply cut the damaged corner off and replaced it with my $5 seat cover which came from a Honda XR250RG. It looks very used, but that was what I wanted and cheap too. Just stuck it all back together with contact adhesive. I was thinking about sticking something else over the join for aesthetics and for additional reinforcement. maybe a natural brown leather belt?

Wednesday, October 13, 2010

Cafe Racer influences


I thought it would be interesting to see how crispy-one would look with a cafe racer style seat and a classic exhaust in under and over configurations. Is it too cafe? Perhaps.....

I also deleted the side covers altogether and added a foam pod filter in the first two concepts.

Thursday, October 7, 2010

Vintage Supermoto LowRider Version!


What do you think of this concept?

Vinatge Supermoto is FINISHED :-]


Well not really, this is my latest concept in photoshop. Still not really happy with it. Will keep going till I am H A P P Y with it…

Saturday, October 2, 2010

More concepts and my need to be creative


Some of us need to be creative on a daily basis, it’s a like oxygen, without it I feel I would suffocate. So here are four more ideas exploring the use of leather belts, diagonal lines through the tank/sidecovers, some more wood and a red seat patch.

Wednesday, September 29, 2010

Motorcycle Seat Repair & Modify 101


The right rear corner of the seat was ripped anyway, so I thought I might as well do a cut and shut job on the seat to improve the ‘lines’. The local wrecker was in a generous mood and gave me an old seat for just $5 (probably all its worth) so I could salvage it to repair my seat. I don’t want the seat to look brand new, but still want a custom look. See if you can figure out what I am going to do using the two images as a reference

Saturday, September 18, 2010

What’s going on here then?


Apart from the fact that I’m almost out of Scotch....

Lucas type 679 Beehive Tailight


Received my new vintage Lucas type 679 ‘Beehive’ tailight from Trojan Classic Motorcycles. This was used on most British motorcycles from 1968-72. Looks very good, all I need to do now is make a nice looking bracket to mount it with.

Monday, September 13, 2010

Pre-loved stuff from the verge side


Who doesn’t love rummaging through piles of old junk? You never know what you might find! We are currently getting ready for a bulk rubbish collection, so everyone is piling up their junk on the verges. These are a few old bits I had pulled out of the piles. A couple of old leather straps & loops, some weathered timber veneer and a first generation iMac keyboard. Should be interesting to see how we can make use of these items.

Sunday, September 12, 2010

Wrenchmonkees have my sticker on their door


The Wrenchmonkees got my sticker!
Go check out their blog & website, cool stuff!

Wednesday, September 8, 2010

Crispy Cycles T-shirts


Get your original design Crispy Cycles T-shirt now, available in sixes XXL – S. Then when you get you shirt, take a pic of yourself wearing it and I’ll post it on my blog. Drop me a line at crispycycles@gmail.com for all the info.

Saturday, September 4, 2010

Trial fit of 5x17 Supermoto wheel


Used my wheel building jig again to build a mock-up of the 5x17inch supermoto rim laced to the standard DR400 hub and a 150/70 street tyre. Looks really ‘tough’ bolted in place and looks like it will fit without too much trouble. Will need to modify the brake torque arm and probably make a spacer for the rear sprocket so the chain clears the tyre. I have also cut and shut the seat which I will recover using some old and some new materials.

Saturday, August 28, 2010

I love it when a plan comes together….


By sheer luck it turns out that the DR400 and KX250 steering stems have exactly the same bearings, so it will make the fork swap a lot easier. The DR stem is on the left. If anyone wants to do a fork swap then I came across this useful document located at:

http://www.ohiocaferacers.com/OCRStemSizes.pdf

Wednesday, August 25, 2010

Mounted rear tyre, seat & tank.


Thanks to inertia@PSB for donating the rear tyre (yes it is street legal) and after digging through all of my boxes of parts, I found the missing tank rubber today and mounted up the fuel tank. The lower image is exactly how the bike looks now, the upper images I have actually photoshopped the seat so it is thinner and improves the lines. My final tank ‘sticker’ does not work so well now. Its kind of lost in the whole thing, so the larger ‘sticker’ seems to work better. Back to the drawing board then....

Friday, August 20, 2010

More Vintage Sticker Goodness


Here is the latest concept for vintage 'woodie' tank stickers.
This has also been inspired by the Suzuki TM sticker pictured.

Sunday, August 15, 2010

Chrome Front Guard Mounting


The devil is in the detail. The devil is the time it takes to acheive it!

Friday, July 30, 2010

It looks like this!


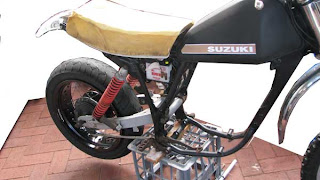
This is what the bike looks like right now. The front end as it is now is only temporary, only the front guard will remain.

Chrome Mudguards


As this is a vintage style bike chrome mudguards are definitely the way to go. The rear guard from an XS Yamaha fits like it was made for it. I trimmed down an old plastic guard for the inner half, painted it matt black and bolted it all up. The front guard is from a CX Honda, and the mounting bracket is a mock-up for a trial fitment. See above for the results.

Wiring - Job Done


I am still waiting for the rectifier to arrive, but all the wiring is completed. A big thanks to David and Cameron for doing all the soldering and cut and shut that was required. I managed to find an older style round headlight (6 volt) and mounting brackets that would do the job.

Monday, July 12, 2010

Crispy Costs Part 1


Custom bike builders rarely talk about how much their bikes actually cost. So her is my total so far, having given myself a total budget of $5000 for this project, it will be interesting to see how close I get to that amount. Obviously I am not allowing for any labour costs for myself. This will be parts and external labour costs only.

Thursday, June 24, 2010

Vintage Look Fuel Tank


While I am waiting for a rectifier to come from Japan, I decided to tackle painting the tank. It was always going to be painted matt black. But what to do with the tank decals?
Seeing as how this is a vintage project I thought it would be appropriate to use some vintage materials. So I am experimenting with the use of wood veneer as a panel on the sides. The lighter colour is teak and the darker one is wenge. I must admit that I did not like it much at first, but it is definitely growing on me.

Wednesday, May 26, 2010

Crispy #01 - Wiring fun-daa-mentals


This is what the bike looks like at the moment. I am going to test all the wiring before going any further. I just need to buy a new ignition switch and battery. Its much easier to sort these problems out now than with everything else assembled.

Tuesday, April 27, 2010

Crispy #01 - Bits 'n' Pieces


Old bike, renovators delight! Pictured above is all the rest of the pieces. Apart from the frame it appears as if there is at least two of everything. Even came with new engine gaskets, some new cables and a workshop manual. Should have it running by lunchtime!!!

Tuesday, April 13, 2010

Crispy #01 - Got some forks


Been looking for months and months for a front fork for Crispy #01. And I am pleased to say that I finally found some, at the right price of course! They are actually Kayabas from a '94 KX250. They are in good nick and the seals are not leaking!

Wednesday, April 7, 2010

Crispy #01 - Found an engine!


Found this engine at the right price. Has good compression, barrel is good apart from a few fins broken off, even the clutch is within specs. I just need to find a carby, exhaust and coil to get it running. I'm not going to say what it is but its bigger than 400cc and a two-stroke (obviously).

Thursday, March 18, 2010

Crispy #01 - Concept 2


This concept is based on the ubiquitous Suzuki Ts185 but with a slimmer tank , 17s and Ohlins USD forks.

Thursday, March 4, 2010

Potential base bike for Crispy #01


Found this old clunker for sale. It looks like a potential base bike for Crispy #01, its an extremely well-used Suzuki DR400, probably around 1980 model. Note the sports air-filter and two-tone paint scheme, cool! I will hopefully get a look at it in the next few days. Check out how f-ugly it is! Looks like its still got most of its road gear on it too!

My first wheel build


Pictured above is my first wheel that I built. It took three attempts to get it laced correctly and then a little bit of tweeking to make sure the long and short spokes were in the right places, and it is fairly close to being true. There are quite a few wheel-building guides on the web, but in the end it was a fair bit of trial and error to get it right.

Monday, March 1, 2010

Crispy #01 - Wheel Building Jig in Situ


Pictured above is the hub and rim shown in place on my jig. The next task and most complex task is to fit the spokes in the right pattern. Now that is going to take some time!

Crispy #01 - Wheel Building Jig


Pictured above is a wheel building jig I designed and made up which only cost me around $20 in materials. The wheel will be built on its side with the hub going over the centre dowel and the rim sitting on the four wood blocks which are spaced so the relationship between the hub and rim is correct. It will not be exactly true, but will be very close and will make final wheel truing an easier task.